TattoosAI
You've typed “Japanese dragon tattoo” into an AI generator, chosen a dramatic reference, and watched the result appear. The dragon looks impressive at first glance, but its claws are inconsistent, maple leaves float around it, and a koi seems suspended in empty space. You wanted a sleeve. The model gave you a collection of attractive stickers.
That gap matters. Irezumi is built as a connected body-scale composition, not a pile of individually appealing motifs. AI can help you explore dragons, koi, peonies, waves, and color palettes, but it won't automatically understand how those elements should travel across a shoulder, bend around an elbow, or leave enough breathing room for skin to remain part of the design. The strongest ai tattoo japanese workflow starts with composition literacy, then turns that understanding into prompt language.
Table of Contents
- Why Most AI Japanese Tattoos Fall Flat
- How Traditional Irezumi Actually Works
- Building Your First AI Japanese Tattoo Prompt
- Choosing the Right Motif for Your Body Zone
- Refining Generations Into Artist-Ready Art
- Respecting the Style and Working With an Artist
- From Concept to Confident Booking
Why Most AI Japanese Tattoos Fall Flat
The problem usually begins with a prompt that reads like a shopping list: “Japanese dragon, koi, cherry blossoms, red sun, traditional style.” Each word may be relevant, yet the model has no clear hierarchy. It doesn't know which subject should dominate, what should sit behind it, or how the image should continue beyond the frame.
Traditional Japanese tattooing treats the body as a connected surface. Wind bars, waves, clouds, and other background structures bind separate motifs together, while negative skin creates rhythm and depth. A dragon may arc through the sleeve, a koi may follow a river-like current, and blossoms may occupy openings without becoming random decoration. Japanese tattoo guides describe this body-scale approach as a system in which backgrounds help the artwork flow across a sleeve or back piece rather than leaving isolated images floating on skin. ReviewTattoo's guide to Japanese tattoo styles offers useful context for these connected compositions.
The floating-sticker test
Take any AI result and ask three questions:
- Can I trace a visual current? Follow the waves, wind, clouds, or branches from one edge of the design to another.
- Is there a clear hero motif? Your eye should know whether the dragon, koi, phoenix, or mask is the main subject.
- Would the design survive a curved body zone? A square image may look balanced on screen but collapse when wrapped around an arm or shoulder.
If the answer is no, the issue isn't necessarily the motif. It's the missing structure.
Studio rule: Choose the main subject first, then design the environment that carries it across the body.
AI models tend to favor portrait-like framing. They create a centered figure with decorative objects arranged around it, because that format resembles posters, illustrations, and character art. A sleeve needs a different instruction set. You must name the body zone, direction of movement, background grammar, and intended expansion path.
The rest of your process should therefore move in this order: identify how irezumi is composed, translate that structure into a prompt, generate variations, and hand the artist a reference sheet rather than a supposed final stencil.
How Traditional Irezumi Actually Works
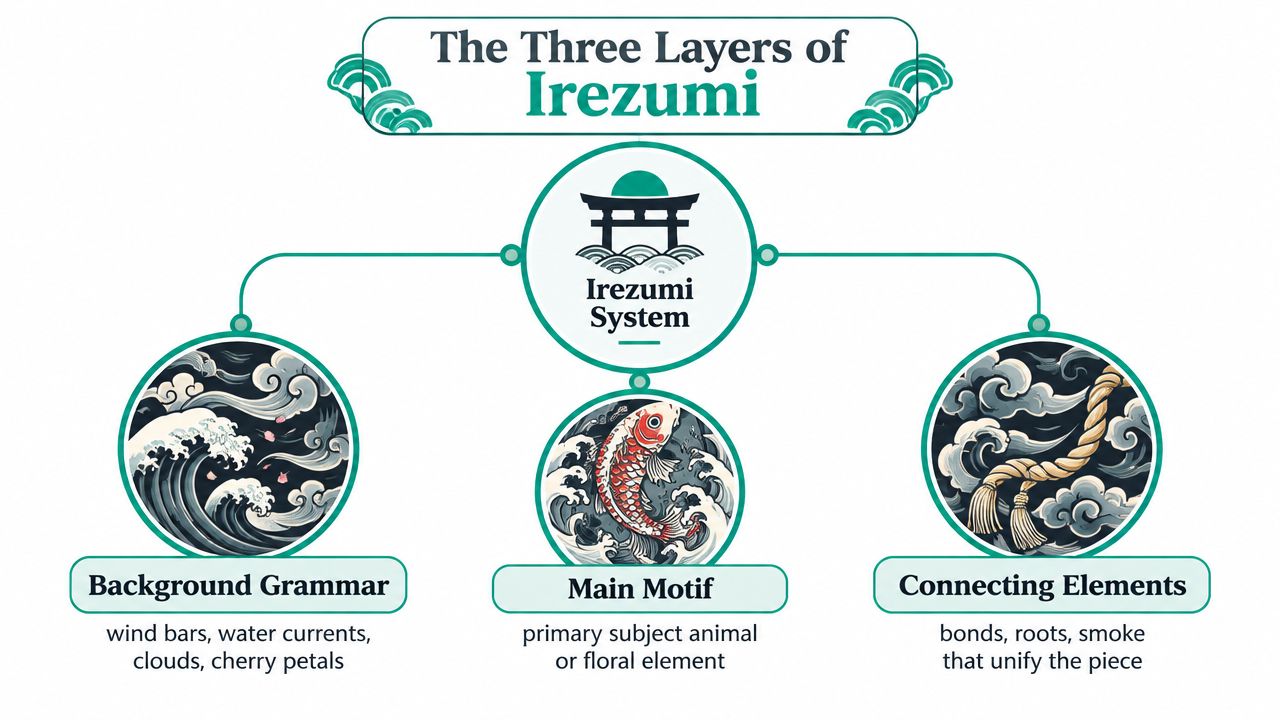
Irezumi works as a layered visual system. You can make your prompts more coherent by naming the layers separately, even when they appear together in the final image.
The first layer is background grammar. Wind bars, water currents, clouds, and blossoms connect the composition and occupy the spaces between major subjects. They aren't filler. A wave can direct a koi through the lower arm, while wind bars can carry a dragon around the shoulder. Cherry petals or maple leaves may punctuate open areas, but they should follow the movement of the design instead of appearing as scattered symbols.
The second layer is the main motif. This is the subject that carries the strongest silhouette and contrast, such as a dragon, koi, phoenix, peony, or oni mask. Supporting motifs can occupy the shoulder, ribs, thigh, or surrounding panels, but they shouldn't compete equally with the central subject.
The third layer is connecting structure. Roots, smoke, ropes, clouds, and related transitional forms can bridge changes in anatomy or tie adjacent motifs together. In practical prompt language, these elements tell the generator that the design should continue through the body rather than stop at the edges of a portrait frame.
Flow matters more than a perfect front view
Irezumi compositions cross joints and use the body's curves as part of the movement. A sleeve shouldn't look like one image pasted onto the front of an arm, with the elbow treated as an accidental interruption. A back piece needs a plan for the spine, shoulder blades, and lower back, even if the first AI draft only shows one view.
Negative space also deserves precise language. Traditional work can use substantial background coverage, but that doesn't mean every inch should receive dense color. Ask for controlled skin breaks, breathing room around the hero motif, or a cloud opening that preserves separation.
Here's a vocabulary list you can adapt:
- Body format: full sleeve, half sleeve, back piece, chest panel, thigh panel.
- Hero subject: one dominant dragon, koi pair, phoenix, peony cluster.
- Background grammar: swirling water, layered clouds, wind bars, maple branches.
- Connection: continuous flow across the shoulder and elbow, expanding background, unified panel.
- Color direction: sumizumi black and grey, red-black-blue, restrained Edo-inspired pastels.
- Drawing language: bold outer contours, controlled internal lines, readable silhouette, tattoo-ready composition.
For a broader overview of common Japanese approaches, compare these terms with the reference material in Japanese tattoo styles. You can also use the following video as a visual reminder that tattoo design involves more than selecting an isolated icon.
Building Your First AI Japanese Tattoo Prompt
Start with the body, not the animal. If you begin with “a beautiful Japanese dragon,” the generator will usually create an illustration designed to be viewed inside a rectangular frame. If you begin with “full outer arm sleeve, movement from wrist to shoulder,” you establish a physical job for the image.
Step one, lock the visual lane
Choose a Japanese or irezumi style preset when your generator offers one. If presets are unavailable, provide a carefully chosen Japanese tattoo reference as a style anchor and describe the qualities you want, such as bold contours, connected background, traditional composition, and readable silhouettes. This helps prevent the model from drifting toward watercolor, anime character art, or ornamental fantasy illustration.
A tool such as TattoosAI can generate Japanese-style concepts from a written idea and let you explore style and color directions. Treat that output as exploratory material, especially because the body-placement decision still needs an artist's judgment.
Step two, write in layers
A useful prompt names six things in one sentence:
- Body zone and format, for example, full sleeve from wrist to shoulder.
- Hero motif, such as one ascending ryū dragon.
- Supporting motif, such as peonies near the shoulder cap.
- Background grammar, such as curling wind bars and layered clouds.
- Palette, such as sumizumi black and grey with restrained red accents.
- Line treatment, such as bold outer contours and controlled internal detail.
Try this:
Full outer-arm Japanese irezumi sleeve, one ascending dragon flowing from wrist to shoulder, peonies concentrated at the shoulder cap, continuous wind bars and layered clouds connecting the composition, sumizumi black and grey with restrained red accents, bold sujibori-style outlines, clear negative-skin openings, designed to wrap around the arm rather than appear as a centered portrait.
The wording tells the model what leads, what supports, and what connects.
Step three, change one variable at a time
Don't rewrite the entire prompt after every disappointing result. Use focused swaps:
- “Add wind bars behind the dragon without obscuring its silhouette.”
- “Soften the background contrast around the elbow.”
- “Replace scattered blossoms with a connected peony branch.”
- “Preserve a controlled cloud opening near the inner forearm.”
- “Reduce decorative objects and keep one dominant hero motif.”
This makes it easier to tell whether the issue comes from composition, color, density, or anatomy. If you're also exploring motion or presentation assets around your concept, a cinematic video creation tool can help you present a mood board, but the tattoo reference itself should remain clear and placement-focused.
Step four, preserve useful iterations
Use seed control when your generator provides it. A stable seed can help you keep a promising dragon posture while changing the background or palette. Save versions with notes such as “strong silhouette, weak elbow flow” or “good waves, crowded shoulder,” then regenerate from the strongest foundation.
For more generator-specific ideas, see this guide to a Japanese tattoo generator. Your reusable template is:
Japanese irezumi [body format] featuring [one hero motif] moving from [starting point] toward [ending point], supported by [secondary motif], connected with [background grammar], using [palette], [line and shading direction], with [negative-space instruction], designed to wrap naturally around [body zone].
Choosing the Right Motif for Your Body Zone
A motif can be culturally familiar and visually striking yet still be a poor fit for the place you want tattooed. The body zone determines how much length, curvature, and movement the subject has available. Compare the choices before you ask an AI model to draw.
| Motif | Prompt Anchor | Best Body Zone | Design Strength |
|---|---|---|---|
| Dragon, ryū | “One ascending ryū dragon with a long serpentine body” | Ribs or full sleeve | Movement and directional flow |
| Koi | “Koi swimming upstream through a continuous river current” | Thigh or calf | Movement and readable scale |
| Phoenix, hō-ō | “Full hō-ō phoenix with spreading tail feathers” | Upper back and shoulder cap | Broad scale and dramatic silhouette |
| Snake | “Japanese snake coiling in deliberate loops around the limb” | Biceps | Circular movement and adaptable wrapping |
| Sakura or peony | “Connected sakura and peony branch, blossoms at varied stages” | Sternum or shoulder | Rhythm, softness, and framing |
| Oni mask | “Centered Japanese oni mask inside a structured forearm panel” | Forearm | Strong frontal identity and compact scale |
Long motifs need a path
A dragon has an obvious advantage on ribs or a complete sleeve because its body can create a long directional line. Add curling wind bars or clouds to help the AI extend that movement, and specify where the head, torso, and tail should land. Without those instructions, the model may compress the dragon into a centered emblem.
A koi works differently. Its body already suggests a river journey, so a thigh or calf can give it room to travel along a longer vertical or diagonal path. Prompt for water that follows the leg rather than a fish isolated inside a decorative oval.
Broad motifs need room to breathe
The phoenix benefits from a wide surface. On an upper back, its wings and tail can form a large silhouette, while clouds or flames support the composition without squeezing the subject into a narrow panel. On a small area, the same motif may lose its identity through excessive feather detail.
Snakes are flexible because their bodies can coil around a limb. That flexibility doesn't remove the need for planning. Tell the model whether the head faces upward, outward, or toward the inner arm, and reserve background elements for the spaces between coils.
Flowers and masks solve different problems
Sakura and peony clusters are useful framing motifs, particularly around a sternum or shoulder where blossoms can follow the body's natural curves. Ask for a connected branch or controlled cluster instead of a scattering of flowers.
An oni mask is more self-contained. It reads well in a forearm panel because its face can remain front-facing and high contrast. The surrounding background should frame the mask, not compete with its expression.
Placement test: Flatten the intended body zone into a simple outline and ask whether the motif still has a beginning, middle, and end.
Refining Generations Into Artist-Ready Art
An AI image becomes useful at the point where you stop treating it as finished artwork. The first pass is a direction finder. Your job is to isolate what works, remove what doesn't, and make the composition legible to someone who will redraw it on skin.
Begin with an upscale or cleanup pass in an image editor. Look closely at fingers, claws, eyes, scales, petals, and repeated background marks. Diffusion models often produce wobbly contours, duplicated anatomy, mismatched facial features, and decorative details that merge into visual noise. Don't ask the tattoo artist to interpret every flaw. Mark the areas that need correction or redraw them on a separate linework layer.
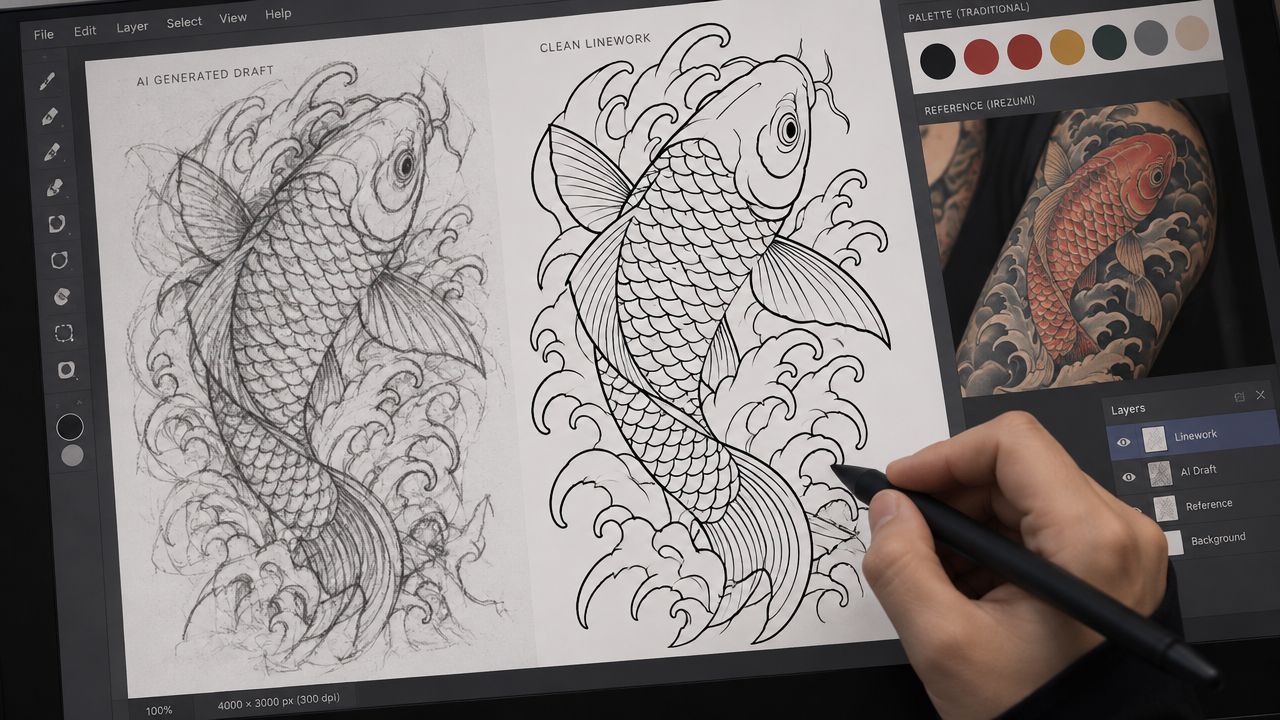
Correct the view before correcting the detail
A front-facing portrait view can hide serious placement problems. Ask for a flat side-on view for a rib or calf design, an outer-arm view for a sleeve, or a top-down layout when the composition needs to map across a broad back. The artist can then see the intended path instead of guessing how a square image wraps.
Request separate background studies when necessary. A wave tile, cloud section, or wind-bar panel gives the artist room to adapt the connecting grammar around your anatomy. It also prevents the background from becoming a dark, undifferentiated mass.
Check the value structure in grayscale. The hero motif should separate from the background through contrast, shape, or both. If every element has equal darkness, the design may look dramatic on a screen but become difficult to read at a normal viewing distance.
Prepare a simple contact sheet with:
- Motif close-up: corrected anatomy and important line details.
- Body mockup: the full composition placed on a silhouette or body photograph.
- Value map: black, grey, color, and skin openings separated clearly.
Treat the packet like a conversation starter, not a stencil. If you're adapting designs for products or print while you explore, advice on scalable Etsy designs tips may help with flexible artwork, but tattoo artwork still needs adjustments for skin, anatomy, and aging.
Respecting the Style and Working With an Artist
An AI generator can reproduce visual signals without understanding their cultural weight. That makes your research and studio conversation important, particularly with imagery connected to religion, folklore, family identity, or regional symbolism.
Be cautious with specific deity or yōkai names, shrine crest motifs such as kamon, and sacred kanji used as decorative quotations. Verify the meaning and context before placing them on your body. A character that looks attractive on a screen may carry a meaning you didn't intend, while an invented or malformed character can undermine the design immediately.
Japanese tattooing also has a complicated social history. Documented roots reach back to the prehistoric Jomon period, roughly 14,000 to 300 BCE, and the tradition later became associated with Edo-period artistry and social identity. Japan formally banned tattoos in 1868 during the Meiji modernization drive, and the prohibition was lifted in 1948, leaving a long arc from ritual marking to punishment, stigma, and gradual normalization. These historical details are summarized in this overview of Japanese tattoo history and prevalence.
The legal position shifted again in September 2020, when Japan's Supreme Court ruled that tattooing isn't a medical practice, a decision that improved the standing of tattoo artists there. Contemporary reporting in 2022 said around 1.4 million Japanese adults had tattoos, nearly double the number reported in 2014, while a cited survey found that 60% of people in their 20s and younger believed tattoo rules should be relaxed. Coverage of Japan's changing tattoo culture provides that context.
Choose an artist whose portfolio shows connected sleeves, back pieces, and body-scale planning, not only isolated flash. Bring your AI image as a starting sketch. Ask the artist to redraw it for your anatomy, adjust line weight for skin aging, correct cultural details, and decide which elements should be removed. That handoff is where a generated concept becomes wearable art.
From Concept to Confident Booking
Confidence comes from making a few clear decisions before you book. You don't need a perfect image. You need enough structure for an experienced artist to understand your intention, challenge weak choices, and build a design that belongs on your body.
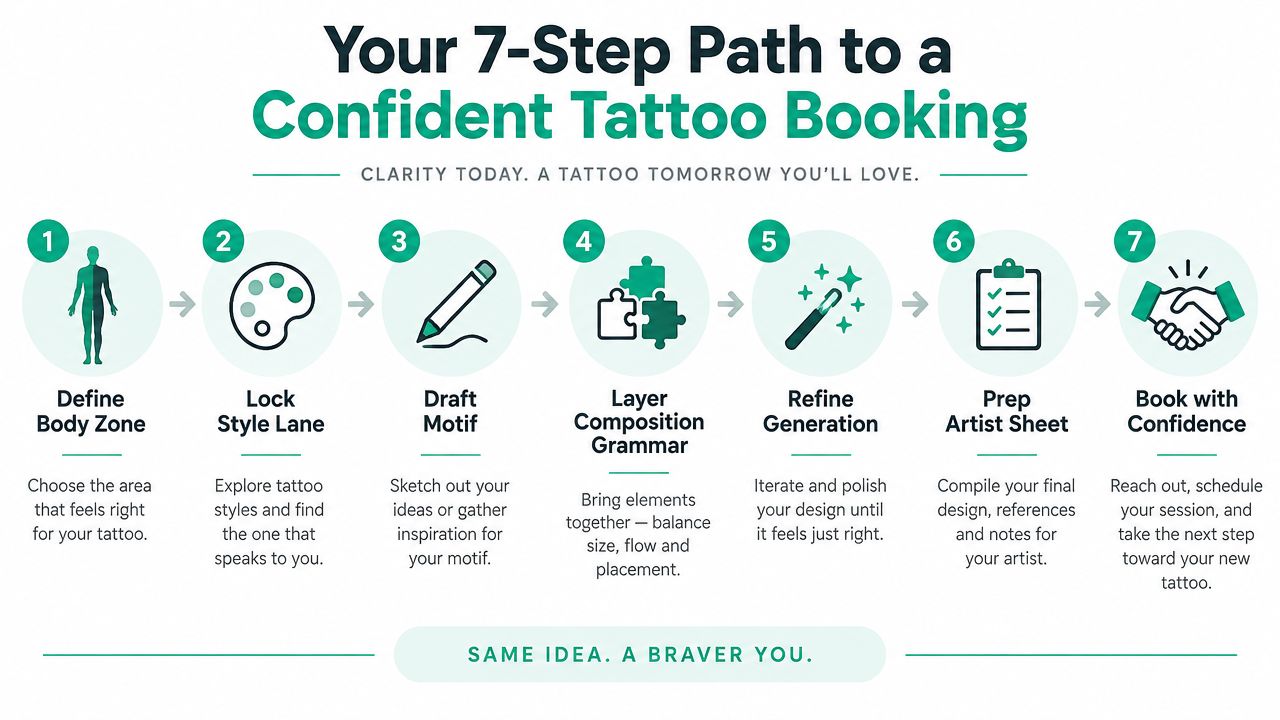
Use this seven-step checklist as a short working session:
- Define the body zone. Trace the arm, thigh, ribs, back, or shoulder area you're considering.
- Lock the style lane. Choose Japanese irezumi, then decide whether the palette is black and grey, classic color, or restrained pastel.
- Draft the motif. Pick one hero subject instead of combining every symbol you like.
- Layer composition grammar. Add waves, clouds, wind bars, branches, or another structure that connects the image.
- Refine the generation. Correct anatomy, reduce clutter, and test the design from a placement-friendly view.
- Prepare the artist sheet. Include a close-up, body mockup, and grayscale value map.
- Book with confidence. Choose a studio or artist based on body-scale work and discuss the concept before committing.
Spend roughly a short, focused burst of time on each checkpoint rather than endlessly polishing a single prompt. If you're comparing local studios, a resource about choosing a tattoo studio in Anderson can help you think about portfolio fit, consultation quality, and studio standards, regardless of where you live.
Before you request an appointment, perform the flow test. Follow the main subject from its starting point to its endpoint. Check that the background connects the panels, the joints don't create awkward breaks, and the negative skin is intentional. If the image fails, revise the composition before adding more detail.
Pick one motif family today, open your generator, and write three different prompts before bed. Save the strongest versions, assemble the reference sheet, and book a consultation only after the concept passes the flow test. Prompt first, polish second, consult always.
TattoosAI lets you generate Japanese-style tattoo concepts from a written idea, explore motifs such as dragons, koi, phoenixes, and blossoms, and refine style or color directions before speaking with an artist. Visit TattoosAI to turn your first composition into a focused reference for your studio consultation.