TattoosAI
Fine line tattoos typically use 1RL or 3RL needle groupings, deposit less ink at a shallower depth, and create hair-thin strokes that are precise but more sensitive to fading and placement. They may show noticeable fading in 2–5 years, or 2–6 years depending on sun exposure, friction, and aftercare, according to available fine-line longevity guidance (Insight Britain's fine-line guide).
You may be at the consultation stage with a saved folder of tiny florals, script, constellations, or a realistic miniature portrait. The designs look almost weightless on a screen, but skin isn't a flat digital canvas. Needle grouping, depth, body movement, sunlight, friction, healing, and the artist's control all affect whether those delicate marks stay readable.
A useful way to approach the fine line tattoo style is to treat it like a fine writing instrument. The smaller the nib, the more elegant the mark can be, but the more carefully you must choose the paper, pressure, and placement. Fine line work can be beautiful and personal, but it isn't a promise of permanent razor-sharp detail everywhere on the body.
Table of Contents
- What Fine Line Tattoo Style Means
- How the Style Went From Prison Walls to Mainstream Minimalism
- The Technique Behind Hair-Thin Lines
- Motifs and Placements That Work Best
- Fine Line vs Minimalist vs Single Needle vs Micro Realism
- How Long Fine Line Tattoos Last
- Aftercare That Keeps Razor-Thin Lines Crisp
- Designing and Refining Fine Line Concepts with AI
What Fine Line Tattoo Style Means
A first-time client may bring in a tiny botanical design and say, “I want something delicate, but I don't want it to disappear.” That request captures both the appeal and the trade-off of fine line tattooing. The style uses small needle groupings, commonly 1RL or 3RL round liners, and places comparatively little pigment into the skin. The result is a narrow, light-looking stroke with less visual weight than a traditional bold outline, as described in this technical overview of fine line tattooing.
Fine line names the visible result, but the artist's method matters just as much. A single-needle setup can produce an exceptionally narrow mark. A 3RL grouping creates a slightly fuller line while keeping the restrained appearance. With less ink in the skin, small changes in hand speed, skin tension, or needle depth can change the line's consistency.
The right expectation for a first tattoo
Fine line work requires a different maintenance expectation from bold tattooing. Traditional bold outlines carry more pigment and visual structure, so they generally remain readable through distance, movement, and gradual softening. Fine line designs may lose some delicate details over time, and a touch-up can be responsible maintenance rather than proof that the tattoo failed.
Placement deserves the same attention as the drawing. A delicate branch on a stable, low-friction area faces different conditions from tiny lettering across a finger crease. Skin movement, rubbing, and sunlight all influence how the mark settles. Judge the design at its intended size and on the actual body area, not only as a clean image on a phone.
Use the style's 1970s Chicano origins as historical context, then connect that history to today's needle-depth control. The remaining decisions are practical: choose a placement that matches your tolerance for softening, select motifs with enough spacing to stay legible, and discuss healing and future touch-ups with the artist. This approach turns fine line from a vague promise of delicacy into a clearer plan for how the tattoo may age.
How the Style Went From Prison Walls to Mainstream Minimalism
The modern technical roots of fine line tattooing are commonly traced to the 1970s Southern California Chicano tattoo scene. Artists working in Los Angeles prison and street settings developed single-needle methods for black-and-gray portraits, script, and religious imagery, often using much thinner outlines than traditional tattooing. This history is documented in the history of the fine line tattoo style.
In those environments, artists worked with limited equipment and had to solve practical problems with precision. The resulting marks suited portraits, names, devotional images, and small symbolic compositions. The style's importance wasn't only its thinness. It introduced a visual grammar built around minimal line weight, subtle shading, and high detail in a compact footprint.
Artists such as Jack Rudy and Freddy Negrete helped codify and professionalize that approach. Their work connected an underground method to a recognizable artistic language, allowing later studio artists to study, refine, and reproduce the look with more controlled equipment.

From specialized method to recognizable aesthetic
As tattoo technology developed, artists gained more reliable access to rotary machines and modern cartridge systems. Those tools didn't erase the technique's history, but they made delicate needle configurations more practical in professional studios.
Fine line tattooing surged into mainstream popularity during the 2010s and especially the 2020s, a trend described as a late-2010s and 2020s popularization wave. Social media helped because thin blackwork, restrained florals, jewelry-like symbols, and miniature portraits photograph cleanly against uncluttered backgrounds.
The result is an evolution rather than a sudden invention. A method shaped by Chicano prison and street tattooing became part of contemporary studio practice, then aligned with growing interest in subtle designs and smaller commitments. Understanding that lineage also explains why the style can combine historic black-and-gray discipline with modern minimalist composition.
The Technique Behind Hair-Thin Lines
A hair-thin tattoo is a coordinated process involving needle grouping, penetration depth, and machine control. Adjusting one variable often requires changes to the others, much like tuning a pen for paper with a different texture.
A 1RL, or one-needle round liner, carries pigment through a single point. A 3RL places three needles closely together in a round formation, creating a slightly fuller stroke that can still look delicate. Artists use these configurations for narrow contours, botanical veins, fine script, and restrained decorative details.
Depth is a control problem, not a beauty setting
A practical tattooing benchmark places ink about 1–2 mm into the dermal layer, while fine-line guidance describes a shallower working range of approximately 0.5–1.0 mm (this tattoo needle-depth guide). These figures are reference points rather than universal settings. Skin thickness, body location, equipment, needle configuration, and the artist's technique all affect the appropriate depth.
The process works like writing with a fountain pen. The needle grouping is the nib, machine movement and pressure influence pigment delivery, and the skin is paper whose texture changes across the body. Excessive depth can cause blowout, where pigment spreads beyond the intended line. Insufficient depth can heal unevenly or fade sooner.
Practical rule: Choose depth and machine behavior for the individual and the placement, rather than chasing a number by itself.
The 1970s technical roots of fine line work help explain why control remains central today. Early practitioners had to manage narrow groupings and limited equipment carefully. Modern machines and cartridges offer greater consistency, but they do not remove the need to match speed, pressure, and depth to the skin.
Fine line deposits less ink than bold lining, so hand speed, skin stretch, and machine control carry more weight. The artist must move steadily enough to create a continuous mark without making repeated passes over fragile skin. A fluid black ink may travel more predictably through a fine grouping, while heavier pigment can be harder to manage in a small configuration.
A tattoo can look visually light during healing while still requiring demanding technique. The margin for error is narrow, and the design needs enough space between details for separate marks to heal without becoming a dense blur. That spacing is a design decision as much as a machine decision.
Motifs and Placements That Work Best
The strongest fine line designs usually respect the body instead of treating it as a blank sheet. Start by asking three questions: How much friction will the area receive? How much sunlight will it see? How much will the skin bend or stretch?
Match the motif to the surface
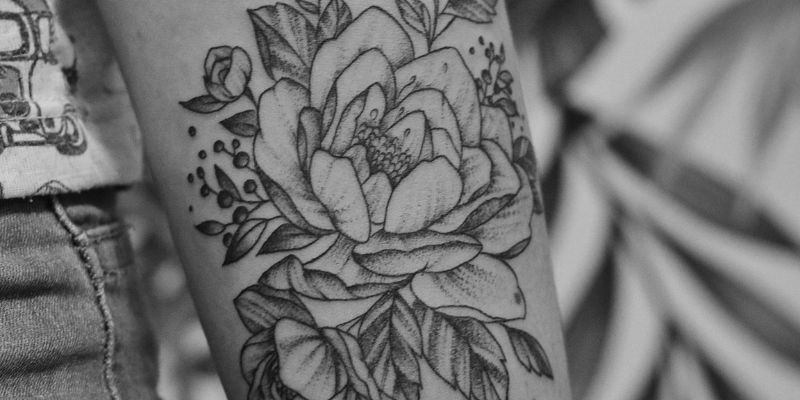
Botanical work suits the style because stems, petals, leaf veins, and seed shapes can be expressed with economical lines. A sprig often follows a limb naturally, while a fuller botanical plate needs a flatter area where overlapping details won't be compressed.
Celestial and geometric motifs work well when their spacing remains generous. Constellations, small orbital symbols, and simple geometric forms can look crisp on the inner forearm, upper back, or collarbone. Their success depends less on complexity than on preserving negative space.
Script and tiny silhouettes require more caution. A short word may look clear at stencil size but lose legibility when placed over a crease or repeatedly rubbed by clothing. A small animal silhouette can work when its outer contour carries the meaning, but internal details may need to be simplified.
Use a placement risk map
| Placement | Relative concern | Why it matters |
|---|---|---|
| Inner forearm | Lower | Usually offers a readable surface with manageable movement and less constant rubbing |
| Upper back | Lower | Often shielded by clothing and provides a broad, stable canvas |
| Sternum and ribs | Moderate | The surface can work well, but movement, breathing, and skin stretch affect the design |
| Spine | Moderate | A narrow vertical composition can fit naturally, but the central placement needs careful sizing |
| Collarbone | Moderate | Attractive for linear botanicals, though sun and clothing exposure vary |
| Wrist | Higher | Frequent movement, washing, and sunlight can soften delicate marks |
| Ankle | Higher | Socks, footwear, friction, and exposure create a demanding environment |
| Finger | Highest | Creases, washing, gripping, and repeated friction make fine script especially vulnerable |
A low-friction, relatively protected area is the sensible starting point for a first fine line tattoo. High-movement areas aren't automatically off-limits, but they require realistic expectations and a willingness to discuss future refinement with the artist.
Choose the placement for the tattoo's future, not only for how attractive the stencil looks today.
Fine Line vs Minimalist vs Single Needle vs Micro Realism
These labels overlap, but they don't mean the same thing. Single needle is a technique, fine line is primarily a visual outcome, minimalist is a design philosophy, and micro realism is a small-scale image style focused on photographic or highly naturalistic detail.
A thin-line rose can be both fine line and minimalist if it uses simplified contours and open skin. A portrait made with a 3RL may belong more accurately to micro realism if its identity depends on gradient shading and tiny tonal transitions.
| Style | Needle Grouping | Typical Line Weight | Ink Saturation | Expected Fade |
|---|---|---|---|---|
| Fine line | Often 1RL or 3RL | Hair-thin to delicate | Light to moderate | More placement-sensitive than bold work |
| Minimalist | Varies by design | Depends on the concept | Usually restrained | Depends on spacing, placement, and pigment |
| Single needle | One needle | Very narrow | Often light, though not always | Requires careful aftercare and realistic maintenance expectations |
| Micro realism | Often fine groupings | Fine contours with detailed transitions | Can include denser shading | Small details may soften as the tattoo ages |
The table describes categories, not fixed technical laws. An experienced artist may use several needle configurations within one piece, and two tattooers can produce very different results from similar equipment.
For a broader look at how simple composition differs from other tattoo approaches, compare the minimalist tattoo style. Then ask what the design relies on. If its identity comes from gradients, tonal modeling, and a tiny photo-like subject, it leans toward micro realism. If it depends on negative space, simple shapes, and selective detail, it may be minimalist fine line.
How Long Fine Line Tattoos Last
A fine line tattoo does not have one fixed lifespan. Guidance commonly places noticeable fading within 2–5 years or 2–6 years, with ultraviolet exposure, friction, pigment placement, and aftercare affecting the result, as outlined in this longevity guide. These ranges set expectations, but they cannot predict one person's skin precisely.
Placement works like choosing the right surface for delicate handwriting. A protected area with little rubbing gives a fine line more contrast to work with than skin that bends, grips, or stays in the sun. Needle depth, pigment deposit, and the way each person's skin heals also determine how much definition remains.
A practical placement framework
Inner forearm and upper back are usually more forgiving starting points. They offer a readable surface and may be easier to cover from daily friction. After healing, exposed skin still needs sun protection.
Wrist and ankle require more planning. Movement, frequent washing, clothing contact, and changing sun exposure can soften a design sooner than a protected placement. If you choose either area, leave enough space between details and accept that maintenance may come earlier.
Fingers, ribs, and feet carry more risk for delicate work. Finger creases, footwear, gripping, body movement, and repeated rubbing can weaken tiny details, making a touch-up more likely. A touch-up can restore contrast, but it cannot create spacing that was too narrow or details that were too small for the location.

Sun exposure is one of the variables you can control. Once the tattoo has healed, sunscreen and protective clothing help preserve contrast, while reducing friction limits avoidable wear. A finger tattoo should not be expected to age like one on the upper back. Choose the placement whose upkeep fits your daily routine.
Aftercare That Keeps Razor-Thin Lines Crisp
Aftercare is both wound care and line preservation. Fine line guidance is inconsistent about products and timing, so your artist's instructions should take priority, especially if they use a particular protective covering or healing method. Medical guidance also recognizes that appropriate aftercare products can reduce discomfort and support skin repair, while not providing a fine-line-specific formula for retaining delicate lines (this clinical aftercare discussion).
Follow a restrained routine
Keep the covering on as directed. Leave the artist's protective covering in place for the period they recommend. It protects freshly tattooed skin from unnecessary contact and contamination.
Wash with a light touch. Use lukewarm water, a mild fragrance-free cleanser, and clean fingertips. Don't scrub with a cloth, brush, or exfoliating product.
Pat, never rub. Use a clean paper towel or let the area air-dry according to the studio's instructions. Rubbing can irritate healing skin and disturb flakes.
Moisturize sparingly. Apply a very thin layer of the plain moisturizer recommended by your artist. Thick layers can leave the skin overly occluded or “soggy,” and excessive product may interfere with a calm healing surface.
Avoid soaking and friction. Skip swimming, hot tubs, saunas, and activities that create heavy sweat or repeated rubbing until the skin has closed. Don't pick flakes or shave directly over the healing tattoo.
Wait before sunscreen. Freshly tattooed skin shouldn't receive sunscreen until it has healed. Use clean, loose clothing for protection, then follow your artist's timing guidance. After healing, regular broad-spectrum sunscreen can help reduce sun-related fading.
For additional maintenance ideas, use this tattoo maintenance guide alongside your studio's instructions. Contact your artist or a medical professional if redness spreads, swelling becomes severe, pus appears, or pain worsens instead of settling.
Aftercare can't correct lines that were placed too shallowly, but it can prevent avoidable irritation, infection, scab loss, and trauma.
Fine line tattoos may heal with temporary patchiness, and a touch-up is sometimes expected after the skin has fully settled. That decision belongs with the artist, not with an impatient attempt to rework the area too early.

Designing and Refining Fine Line Concepts with AI
An AI tattoo generator can help you explore composition before a consultation, but it can't inspect your skin, assess a scar, choose a safe working depth, or guarantee that every generated detail can be tattooed. Treat the output as a visual brief, not a finished stencil.
Begin with a specific request. Include the subject, meaning, approximate size, placement, orientation, line character, and the amount of shading you want. “A flower” leaves too much open. A more useful prompt might be: “Delicate single-needle wildflower sprig, one continuous thin stem, botanical accuracy, no lettering, sparse shading, vertical composition designed for the inner forearm.”
Refine one variable at a time
Generate several directions, then choose the composition with the clearest structure. Change one element per revision so you can tell what improved the design.
- Simplify the silhouette: Remove decorative details that won't remain readable at the intended size.
- Protect negative space: Ask for fewer overlapping strokes and more separation between leaves, petals, or celestial marks.
- Control the line language: Request restrained line-weight variation rather than a uniform digital outline.
- Adapt the shape to the body: Ask for a vertical flow for the forearm, a shallow curve for the collarbone, or a compact composition for a flat upper-back area.
- Separate lettering from imagery: Check spelling, orientation, character spacing, and whether the text will still be legible after healing.
The generator may produce lines that look plausible on a screen but are too close together for skin. Print the concept at its proposed physical size. Hold it against the actual placement, view it from a normal distance, and inspect whether the key shape still reads without zooming.
Turn the image into a studio-ready brief
Bring the reference image, approximate measurements, preferred placement, and a short explanation of what must stay. Tell the artist what can change. A professional tattooer may redraw a leaf, widen a gap, remove micro-details, adjust the curve, or alter the composition to suit their hand speed, machine, needle configuration, and your skin.
Use TattoosAI as one option for generating multiple tattoo concepts from a written idea, exploring styles and color choices, and refining a direction before your appointment. The final design should still be translated, resized, and stenciled by an experienced tattoo artist.
Before booking, check this list:
- Meaning: Can you explain why the subject belongs on your body?
- Scale: Have you judged it at real size rather than on a bright phone screen?
- Spacing: Are separate lines far enough apart to heal as separate marks?
- Placement: Does the area fit your friction, sun, movement, and work routine?
- Artist fit: Does the portfolio show consistent fine line work, including healed examples where available?
- Flexibility: Are you prepared for the artist to redraw details for skin and longevity?
Fine line tattoo style works best when the concept, placement, technique, and aftercare support one another. Use TattoosAI to explore focused concepts and bring your strongest direction to a consultation, where a tattoo artist can adapt it into a safe, placement-appropriate design.