TattoosAI
A half sleeve isn't just one large tattoo placed somewhere on the arm. That advice misses the part that determines whether the finished work feels intentional: the relationship between the focal subject, supporting motifs, directional movement, negative space, and stopping point.
A strong half sleeve should read well from more than one angle. It needs a visual beginning near the shoulder or elbow, a clear path around the arm, and an endpoint that looks finished rather than accidentally cut off. It should also leave room for practical needs, such as workplace concealment, healing between sessions, or a future extension into a full sleeve.
The ten half sleeves ideas below move from foundational composition and major style families toward hybrid designs and lettering solutions. Each concept explains how motifs can pair, where the design can become difficult, and how to turn the idea into a useful TattoosAI prompt before you discuss the result with a tattooist.
Table of Contents
- 1. Japanese Traditional Half-Sleeve Wagara
- 2. Geometric and Minimalist Half-Sleeve
- 3. Watercolor and Splash Half-Sleeve
- 4. Blackwork and Tribal Half-Sleeve
- 5. Dotwork and Stipple Half-Sleeve
- 6. Realism and Portrait Half-Sleeve
- 7. 3D and Illusion Half-Sleeve
- 8. Sleeve Flow and Composition
- 9. Mixed Media and Hybrid Half-Sleeve
- 10. Custom Lettering and Script Half-Sleeve
- Top 10 Half-Sleeve Style Comparison
- Turn Inspiration Into a Sleeve-Ready Brief
1. Japanese Traditional Half-Sleeve Wagara
Japanese traditional composition works best when the arm feels like one connected scene rather than a collection of separate symbols. A koi fish can become the focal motif on the outer bicep, while waves carry movement around the arm and cherry blossoms soften the transition toward the shoulder or elbow.
The style's visual language depends on bold outlines, controlled color, and background elements that fill gaps without making every space equally busy. Clouds, wind bars, water spray, maple leaves, and blossoms can connect the major subject to the anatomy. A dragon, for example, can wrap around the arm so its head remains visible from the front while the body creates movement across the side and back.
Irezumi developed as an organized body-art tradition in Japan during the Edo period, from 1603 to 1868, and its compositional influence can be seen in sleeve-style tattooing worldwide, as discussed in this overview of Japanese tattoo styles. Cultural research matters here. Don't choose a motif only because it looks dramatic. Learn what the subject traditionally represents and discuss respectful use with your artist.
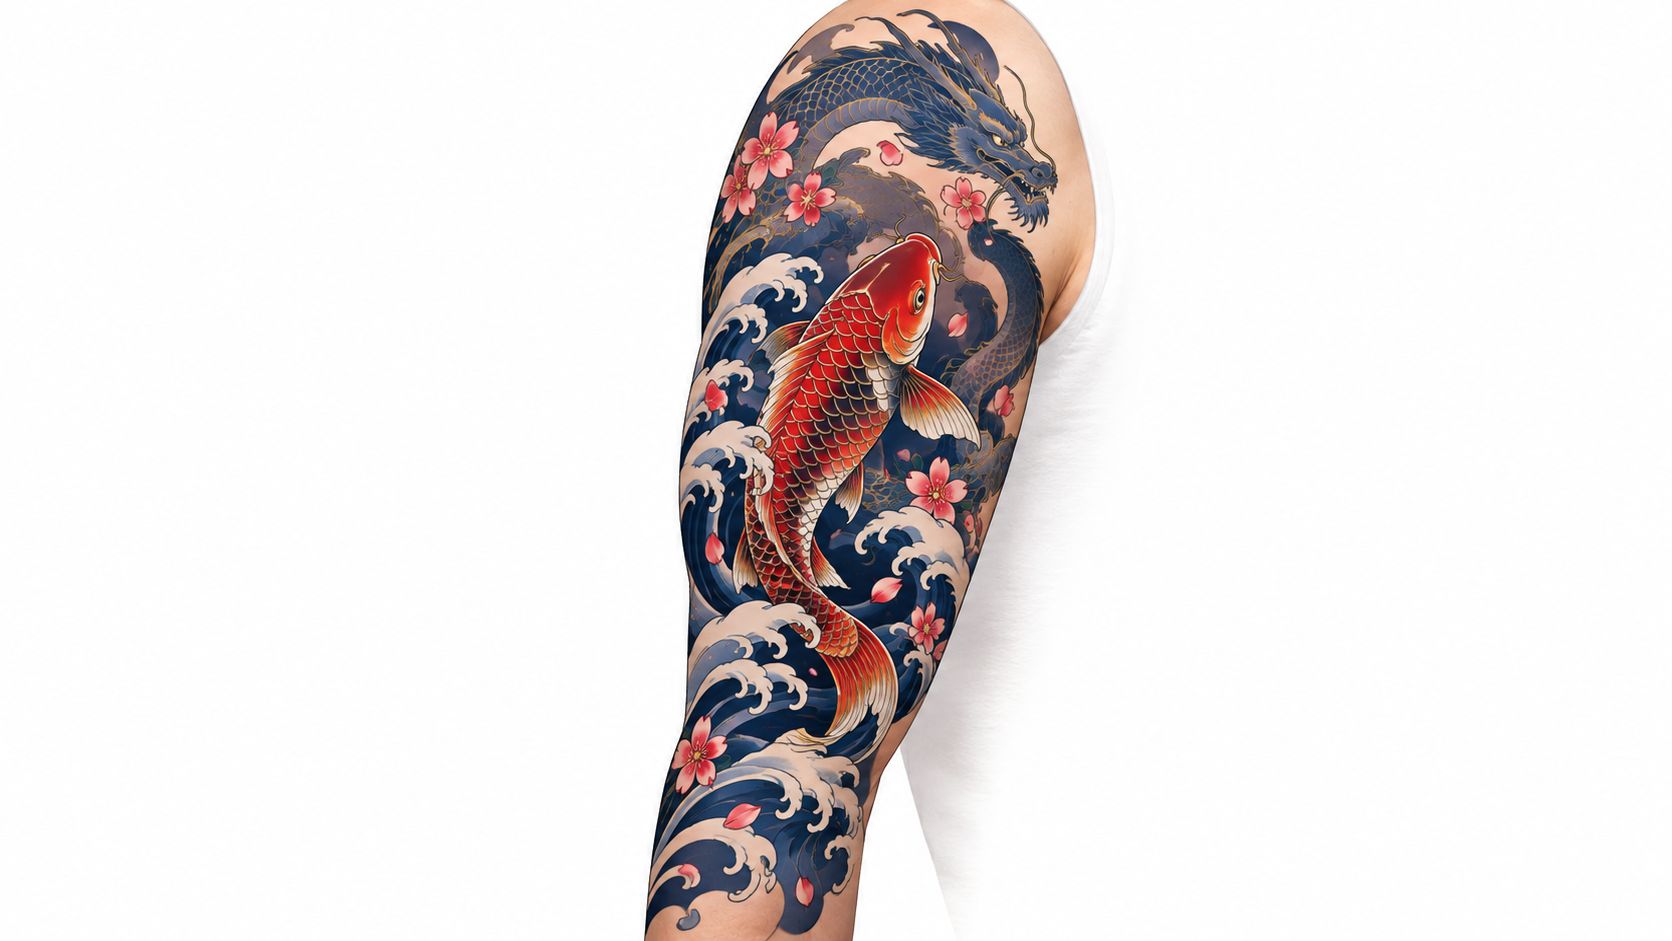
Build the flow before choosing the palette
Upper-arm versions can place the main subject on the shoulder cap and finish with waves or wind near the elbow. Lower-arm versions often need a stronger vertical arrangement, such as a dragon descending toward the wrist or a koi moving through water.
TattoosAI-ready direction: “Japanese traditional half sleeve, red koi swimming upstream around the upper arm, blue water waves, cherry blossoms, bold black outlines, balanced background wind bars, clear negative space near the elbow, composition designed to wrap naturally around the arm, full color.”
2. Geometric and Minimalist Half-Sleeve
Geometric designs make proportion visible. A triangle, circle, or mandala that looks perfect on a flat screen may distort across the bicep, elbow, or forearm, so the artist has to adapt every shape to the arm's changing surface.
A mountain scene can use stacked triangles as the focal structure, with thin lines extending toward the shoulder and denser dotwork gathering near the elbow. An abstract mandala can sit on the outer upper arm, while interlocking circles and restrained line patterns create a quieter transition behind it. A geometric wolf or bear can combine a recognizable silhouette with angular internal planes, giving the subject detail without filling the entire arm.
Negative space is part of the design, not leftover skin. It separates patterns, protects readability, and keeps minimalist work from becoming a dark block. Symmetry can be striking on the front or outer arm, but a perfectly symmetrical design may not wrap comfortably around the sides. Ask your tattooist whether the focal geometry should face forward, follow the muscle, or rotate slightly with the arm.
Test scale against anatomy
Use a simple visual test before committing:
- Focal scale: Make the main shape large enough to remain legible when the arm rests naturally.
- Line density: Keep fine intersections away from areas where movement or curvature may compress them.
- Endpoint control: Let the pattern taper, break, or resolve into clean negative space near the elbow.
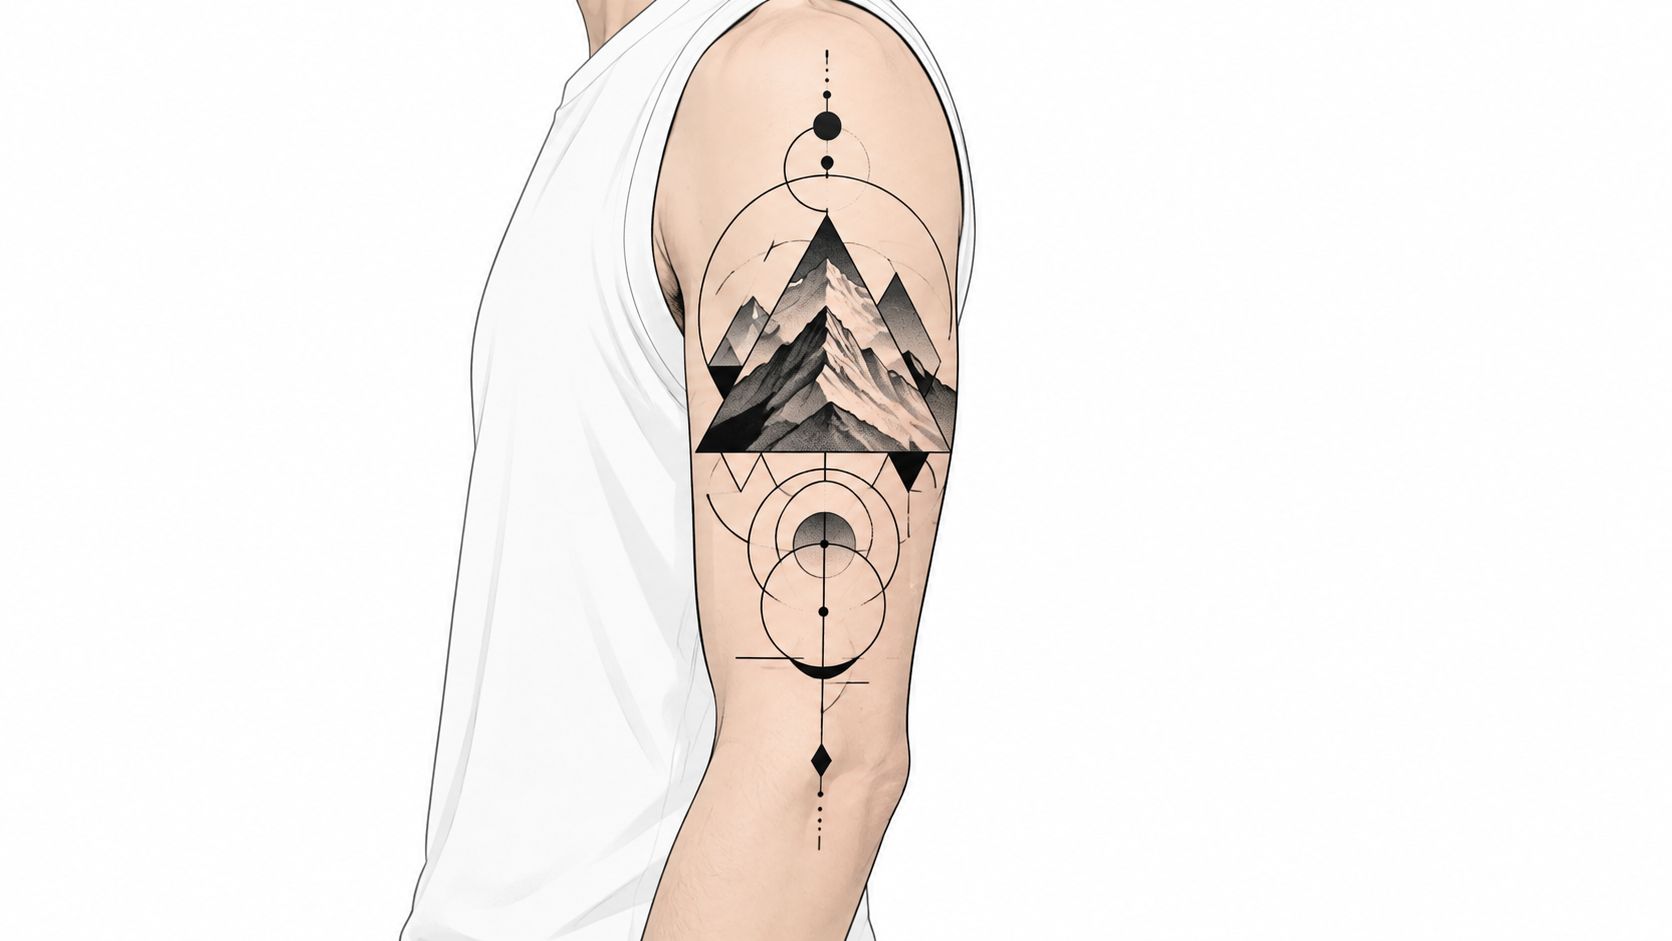
TattoosAI-ready direction: “Geometric minimalist upper-arm half sleeve, layered mountain triangles as the focal motif, circular sun, precise dotwork shading, generous negative space, thin black lines, composition aligned with the bicep and tapering cleanly above the elbow.”
3. Watercolor and Splash Half-Sleeve
Watercolor half sleeves depend on controlled contrast. The colored wash can create atmosphere, but the main subject still needs a stable visual anchor. A bird in flight might use a crisp head and body with loose blue, red, and gold brush effects extending through the wings. A portrait can sit over a soft color field, while flowers can use overlapping washes to create movement between the shoulder and elbow.
This approach gives you expressive freedom, but it also creates a planning challenge. A splash that looks spontaneous in an isolated image may appear unfinished when it reaches the edge of a half sleeve. Decide whether the color fades into skin, follows a deliberate shape, or connects to a second motif.
The palette should account for skin tone, contrast, and long-term readability. Ask a color specialist to show healed examples rather than judging the design only from a fresh image. Direct sunlight can affect tattoo appearance over time, so discuss placement, sun exposure, and aftercare before selecting delicate color transitions.
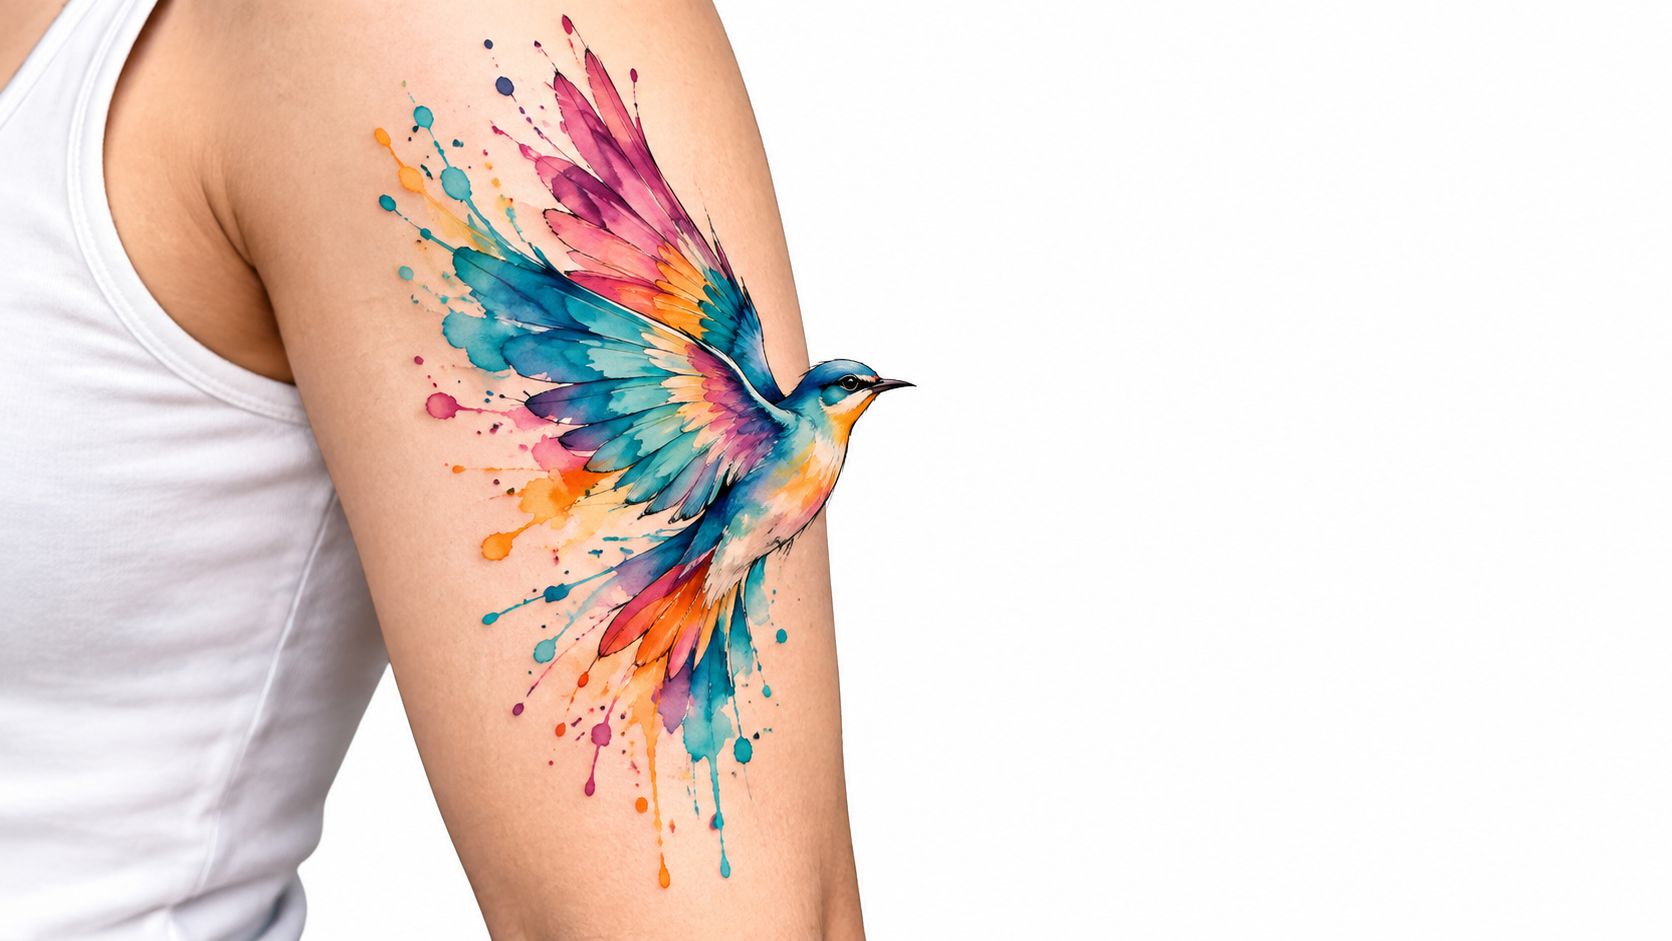
Pair softness with structure
A watercolor scene can combine a defined mountain ridge with loose sunset washes. A floral arrangement can use dark stems and leaves to guide the eye, then let petals dissolve into color. These anchors stop the piece from looking like random paint splashes.
Color planning rule: Choose the emotional mood first, then limit the palette so the supporting washes don't compete with the focal subject.
TattoosAI-ready direction: “Watercolor half sleeve for the upper arm, bird in flight as the focal subject, indigo and coral wing washes, soft brush splashes behind the body, crisp central silhouette, open skin near the elbow, painterly but intentionally composed.”
4. Blackwork and Tribal Half-Sleeve
Blackwork creates impact through the relationship between solid ink and exposed skin. A tribal-inspired band can wrap around the upper arm, while modern geometric cuts interrupt the heavy areas and produce rhythm. An abstract panther or wolf can use solid black shapes for the body, with negative-space lines revealing the face and movement.
The important distinction is between a design inspired by broad tribal visual language and a culturally specific tradition. If you're considering Polynesian, Māori, or another heritage-based pattern, speak with an artist who understands the symbolism and community context. Don't treat sacred or identity-linked motifs as interchangeable decoration.
Modern blackwork can also take an ornamental direction. A mandala may begin near the shoulder, grow denser around the outer bicep, and dissolve into repeating negative-space patterns toward the elbow. The endpoint should be planned early because a sudden straight edge can make the tattoo look like an armband rather than a complete composition.
Preserve clarity in heavy areas
Blackwork needs breathing room. Thick fills placed too close together can merge visually, especially on a curved arm. Hair can also affect how easily fine negative-space details are seen, so ask the artist to review the design on your actual arm rather than relying only on a digital mockup.
Try prompts that identify the exact visual language:
- Traditional direction: “Polynesian-inspired consultation concept,” with cultural research and artist guidance required.
- Modern direction: “Contemporary blackwork, angular panther silhouette, ornamental negative-space cuts.”
- Ornamental direction: “Black mandala, fine repeating patterns, bold outer shapes, open skin around the endpoint.”
5. Dotwork and Stipple Half-Sleeve
Dotwork builds tone through density. Closely placed dots create shadow, while wider spacing leaves the skin brighter. That makes the style suitable for portraits, mandalas, animal heads, and scenes where gradual transitions matter more than solid blocks.
A stippled lion can place the face on the outer bicep, with dots thinning into a mane that guides the eye toward the shoulder. A mountain scene can use heavier dots under the ridges and lighter spacing in the sky. A mandala can sit at the center of the arm, then break into smaller point patterns that echo its geometry without repeating the same shape everywhere.
This technique is highly sensitive to scale. A prompt may produce an attractive fine-detail design, but the tattooist must decide whether the dots have enough room to remain distinct on skin. Review an artist's healed dotwork portfolio and ask how the technique will be adapted to your chosen placement.
Explore the principles in this guide to dotwork tattoo style, then use AI concepts to compare density rather than treating the first image as a stencil.
Use contrast as your navigation system
A portrait needs clear dark accents around the eyes, nose, or jaw so the face doesn't disappear into an evenly shaded field. An animal can use a dark focal feature and a lighter stippled perimeter. For a more abstract piece, vary dot size and spacing to create a path around the arm.
TattoosAI-ready direction: “Dotwork half sleeve on the outer upper arm, detailed wolf head with concentrated stippling around the eyes and muzzle, dot-density gradient through the fur, geometric mountain background, open negative space near the elbow, black ink only.”
6. Realism and Portrait Half-Sleeve
Realism gives the focal subject most of the attention. A family portrait, eagle, wolf, lion, or nature scene can anchor the outer arm, but supporting elements still matter. Smoke, clouds, foliage, architectural fragments, or soft shadow can connect the image to the shoulder and create a controlled finish near the elbow.
Portraits need a reference photo with clear lighting and recognizable expression. A beautiful image isn't automatically a suitable tattoo reference. Your artist needs to see the structure of the face, the direction of light, and the details that make the person identifiable. The same principle applies to animals. A side profile may wrap more naturally around an arm than a straight-on face, depending on how you want it viewed.
A realism half sleeve can be black and grey or color, but each choice changes the supporting system. Black and grey often uses smoke and tonal transitions to connect subjects. Color realism may need a stricter palette so flowers, clothing, or scenery don't compete with the face.
Plan the project around the reference
Independent guide data estimates 8 to 15 hours of ink work for a half sleeve, compared with 30 or more hours for a full sleeve, often divided across multiple sessions. You can review that half-sleeve timing guide before asking an artist for a more precise estimate based on style and complexity.
A realistic half sleeve shouldn't be designed as several unrelated photographs. Choose one dominant subject, then use atmosphere and secondary forms to make the arm read as a single scene.
TattoosAI-ready direction: “Black and grey realism half sleeve, side-profile eagle on the outer upper arm, layered mountain scenery and soft clouds behind it, strong eye detail, cinematic light from above, gradual tonal fade toward the elbow, no lettering.”
7. 3D and Illusion Half-Sleeve
A convincing 3D half-sleeve is built around one viewing decision. A butterfly may lift from the skin, a key may appear embedded, or a portal may recede into the arm. Shadow direction, perspective, and the viewer's position determine whether that effect reads clearly.
Start with the illusion's visual language. Raised objects need a believable contact shadow and highlights along the upper edges. Recessed designs depend on darker inner planes, a defined rim, and consistent perspective. Torn-skin effects add texture, but too much detail can compete with the object and make the arm look crowded.
Wrap the composition around the arm like a stage set. A portal can sit on the outer bicep, with geometric fragments or shadow extending toward the forearm. A key can follow the arm's length, while small cracks or mechanical details guide the eye around the triceps. Repeating the same perspective across these motifs helps the sleeve feel connected.
Rotation creates a practical trade-off. A pattern may look precise from a relaxed, forward-facing view but distort when the arm turns. A design intended to read from several angles needs simpler geometry, wider spacing, and fewer narrow lines. Lighting also changes the result, especially when the illusion depends on a small highlight. Ask the artist to mark the focal object's direction on your arm and test it in the mirror.
Build a clear artist brief
Specify the system before listing decoration:
- Object: butterfly, watch, key, portal, or geometric form.
- Depth: lifting away, sinking inward, or cut into the skin.
- Light: highlight position and cast-shadow direction.
- View: preferred angle and arm position.
- Expansion: open space for future motifs or a clean endpoint.
TattoosAI-ready direction: “3D half sleeve on the outer forearm, realistic butterfly lifting from the skin, delicate cast shadow beneath the wings, subtle torn-skin edge, perspective optimized for a relaxed arm viewed from the front, clean negative space near the wrist.”
8. Sleeve Flow and Composition
Some of the best half sleeves ideas begin with no single style label. They start with a map of how the eye should travel around the arm. A nature composition might place a large tree or animal near the shoulder, use branches and birds to move along the side, and finish with water or grass near the elbow.
A celestial concept can use a planet as the focal point, then connect stars, orbital lines, moons, and clouds through changes in scale. A biography-inspired sleeve might arrange symbols from different life stages, but it still needs a common line weight, palette, or background treatment to avoid looking like a scrapbook.
Placement decisions should come before detailed prompts. Decide whether the half sleeve runs from shoulder to elbow or elbow to wrist, where it faces when your arm hangs naturally, and which area remains visible in daily clothing. The half-sleeve placement guide highlights finish points and existing tattoos as practical planning concerns, not minor details.
Make the endpoint intentional
A shoulder endpoint can follow the deltoid curve, while an elbow endpoint may use waves, leaves, smoke, or a tapered pattern. If you already have tattoos, ask the artist whether the new piece should frame them, overlap them, or leave a deliberate gap.
Generate the main elements separately first, then test them as a group. This helps you see whether the forest, wildlife, and water share enough visual weight before you ask for a final composition.
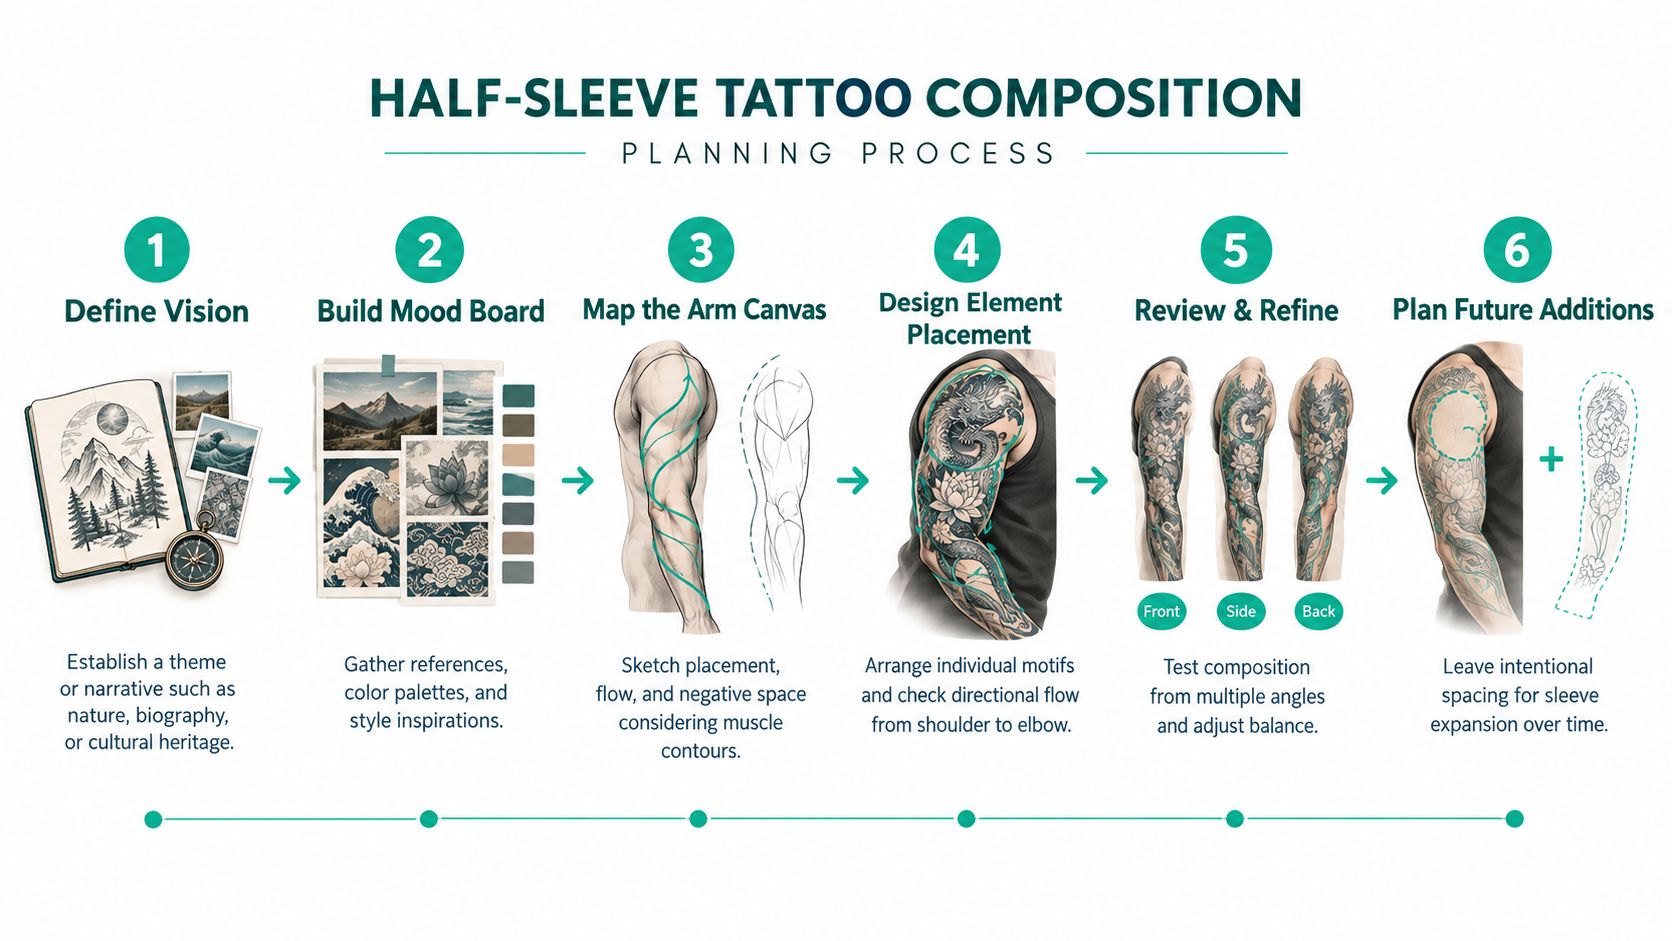
A short visual demonstration can also help you think about arrangement and movement:
TattoosAI-ready direction: “Nature-themed half sleeve from shoulder to elbow, large wolf on the outer arm, pine forest behind the head, flowing river wrapping toward the inner arm, small birds leading upward, cohesive black and grey style, open skin at the lower endpoint, balanced from front and side views.”
9. Mixed Media and Hybrid Half-Sleeve
A hybrid half-sleeve works best when each style has a clear role. Treat the design like a visual conversation: one technique speaks first, while another adds texture, structure, or emphasis. A geometric frame can contain a watercolor portrait, giving loose color a defined edge. A realistic animal can lead the composition, while dotwork builds atmosphere behind it without hiding the silhouette.
Pairing Japanese motifs with geometric elements requires a shared rhythm. Waves, clouds, and ornamental lines can carry the transition around the arm, much like connective tissue between two design languages. A koi beside an unrelated hard-edged pattern may feel divided if neither side shares movement, spacing, or line character.
Choose the primary style before selecting the accent. Two techniques can compete through line weight, color behavior, or shading. A blackwork base with small watercolor accents reads differently from a watercolor focal point surrounded by restrained black geometry. The first option offers stronger contrast and easier future expansion, while the second may need more care to preserve color balance and clarity.
Build the hybrid as a connected system
Map the transition with the artist before refining individual motifs:
- Contained blend: Place a watercolor portrait inside a geometric frame, keeping color within a controlled boundary.
- Layered blend: Set a realistic animal over a stippled or ornamental background, allowing depth without burying the subject.
- Segmented blend: Assign blackwork to the upper arm and reserve color for a defined inner-arm area.
- Bridged blend: Repeat clouds, leaves, or circles so different techniques connect as the sleeve wraps around the arm.
The strongest hybrid sleeves give every technique a specific job. Use AI variations to compare boundary placement, color balance, line weight, background density, and the endpoint. A useful mood board should show those decisions, not unrelated tattoo references.
TattoosAI-ready direction: “Mixed-media half sleeve, realistic fox as the focal subject, fine dotwork forest background, thin geometric frame around the shoulder, muted rust and black palette, clear separation between techniques, cohesive flow toward the elbow, negative-space finish.”
10. Custom Lettering and Script Half-Sleeve
Lettering can form the sleeve's visual spine when it follows the arm instead of sitting across it like a label. A family name may curve around the upper arm, with leaves supporting the letter endings. A short quote can move diagonally from the outer bicep toward the inner arm, while geometric borders guide the eye and create structure.
Treat the words as a motif with both a focal point and a flow. A large name can anchor the upper arm, while flowers, stars, a snake, or small symbols lead the design toward the elbow. Keep supporting images clear of important letterforms. Dense ornament may add drama, but it can reduce readability and leave less room for future additions. Restrained black ink gives the sleeve a clear base; color can add emphasis, though it may compete with the lettering as the design expands.
Readability changes with distance, movement, and skin placement. Decorative script that looks elegant in a flat concept image may become difficult to read when the arm bends, letters shrink, or flourishes overlap. Review the text at different distances, then ask the artist to show how it will sit with your arm relaxed and flexed.
Verify spelling, grammar, accents, and translation before approving the design. A qualified speaker should review another language or writing system instead of an automatic translation. Cultural ornamentation should support the words without presenting imitation as authentic calligraphy.
Give the artist a clear working brief:
- Text: Provide the exact spelling and capitalization.
- Letterform: Choose cursive, serif, blackletter, handwritten, or another defined style.
- Placement: Specify a bicep wrap, vertical path, or diagonal direction.
- Support: Add motifs that reinforce the meaning and connect toward the endpoint.
TattoosAI-ready direction: “Custom lettering half sleeve on the upper arm, the word ‘Persevere' in readable flowing script, lettering curving with the bicep, fine botanical stems and small leaves as supporting motifs, restrained black ink, generous spacing, clean finish above the elbow.”
Top 10 Half-Sleeve Style Comparison
| Style | 🔄 Implementation complexity | ⚡ Resources & time | 📊 Expected outcomes | Ideal use cases | ⭐ Key advantages & 💡 Tip |
|---|---|---|---|---|---|
| Japanese Traditional Half-Sleeve (Wagara) | High, specialist skills, complex composition | High, 8–20+ hrs, experienced horishi, traditional pigments | Bold, narrative, culturally rich; ages well with touch-ups | Cultural storytelling, full-coverage art, athletic arms | ⭐ Timeless symbolism and recognition. 💡 Plan composition to arm contours |
| Geometric & Minimalist Half-Sleeve | Low–Medium, precise line placement | Low, 2–6 hrs, steady-line artist, simple palette | Clean, scalable, long-lasting clarity | Modern aesthetics, add-on pieces, varied arm sizes | ⭐ Fast, versatile, affordable. 💡 Test scaling and placement beforehand |
| Watercolor & Splash Half-Sleeve | Medium–High, color blending expertise | Medium–High, 5–12 hrs, color specialist, frequent touch-ups | Vibrant, painterly, highly visual; may fade/blur over time | Expressive, colorful subjects, social-media-focused pieces | ⭐ Highly artistic and photogenic. 💡 Consider skin tone and budget for touch-ups |
| Blackwork & Tribal Half-Sleeve | Medium, bold fills and negative-space planning | Medium, 4–16 hrs, strong black-ink technique | High-contrast, durable, works on all skin tones | Bold statements, conceal/cover-ups, versatile themes | ⭐ Timeless, low-maintenance. 💡 Avoid excessive solid fills to reduce blowout risk |
| Dotwork & Stipple Half-Sleeve | Very High, meticulous, dot-density control | Very High, 12–30+ hrs, specialist artist, patient sessions | Exceptional fine detail and texture; ages well if well executed | Detailed mandalas, portraits, large-arms for detail | ⭐ Unique fine-art texture. 💡 Review artist dotwork portfolio; allow long sessions |
| Realism & Portrait Half-Sleeve | Very High, photorealistic shading and texture | Very High, 15–40+ hrs, top-tier realism artist, quality refs | Lifelike, emotional, high-impact; quality depends on artist | Tributes, realistic animals/portraits, large canvases | ⭐ Deep emotional resonance. 💡 Provide high-quality reference photos; expect multiple sessions |
| 3D & Illusion Half-Sleeve | Very High, advanced perspective and lighting | High, 6–15 hrs, specialized shading expertise | Striking, dimensional illusions; angle-dependent effectiveness | Showpiece focal tattoos, objects that “pop,” curved arms | ⭐ Memorable technical showcase. 💡 Test from multiple viewing angles and lighting |
| Sleeve Flow & Composition Half-Sleeve | Very High, strategic, long-term planning | Very High, 20–50+ hrs for full sleeve; heavy planning | Cohesive, professional full-sleeve impact; easy to expand | Cohesive themed sleeves, long-term projects, anatomical integration | ⭐ Maximizes overall impact and future additions. 💡 Invest in pre-planning and composition sketches |
| Mixed Media & Hybrid Half-Sleeve | High, balancing multiple styles coherently | High, 8–18 hrs, versatile artist, careful color/value planning | Visually rich and unique; risk of stylistic clash if unmanaged | Personalized eclectic designs, multi-style showcases | ⭐ Maximum creative freedom and uniqueness. 💡 Create a clear mood board and define boundaries between styles |
| Custom Lettering & Script Half-Sleeve | Low–Medium, typography precision required | Low, 1–4 hrs, hand-lettering specialist recommended | Clear personal statements; readability dependent on design | Memorials, quotes, names, integrated text elements | ⭐ Deeply personal and quick to apply. 💡 Triple-check spelling, kerning, and readability |
Turn Inspiration Into a Sleeve-Ready Brief
The best half sleeves ideas become useful when you convert them into decisions an artist can evaluate. Start by choosing one primary visual language. That might be Japanese traditional, geometric, watercolor, blackwork, realism, dotwork, or a controlled hybrid. If you begin with every style you enjoy, the concept will probably lack hierarchy.
Next, select one focal motif and two or three supporting elements. A koi might lead, with waves, blossoms, and wind bars supporting it. A portrait might lead, with clouds, foliage, and soft shadow creating the background. A geometric mountain might lead, with a sun, line pattern, and dotwork atmosphere completing the composition.
Define the two endpoints before you refine the center. State whether the piece runs from shoulder to elbow or elbow to wrist. Then explain how the design should stop. A branch can taper into open skin, waves can form a controlled border, or a geometric pattern can dissolve through decreasing line density. This step matters because guides identify the ending at the shoulder or elbow as one of the hardest practical decisions in half-sleeve planning. The planning guidance for half sleeves also connects the design choice to sessions, healing, concealment, and long-term commitment.
Write the brief in visual terms rather than emotional adjectives alone. “Meaningful” doesn't tell an artist how to draw the piece. “Black and grey realism, eagle facing forward, cloud background, strongest contrast around the eye, open skin at the elbow, readable from the front and outer side” gives the artist something concrete to discuss.
Your TattoosAI prompt can follow this order:
- Placement: upper arm or lower arm, plus the preferred viewing direction.
- Focal motif: the subject that should attract attention first.
- Supporting motifs: two or three elements that connect or frame it.
- Flow: wrapping, diagonal movement, vertical descent, or circular rhythm.
- Negative space: where the skin should remain open.
- Scale: large anchor, medium support, and smaller transition details.
- Palette: black ink, black and grey, full color, or a limited combination.
- Endpoint: the exact area where the design should resolve.
Generate several variations instead of treating one result as a final stencil. Compare how each concept wraps around the arm, whether the focal subject remains visible from the front and side, and whether the endpoint looks designed. You can also test a color version against black and grey, or a dense version against a lighter composition with more negative space.
Use the strongest concepts as conversation material for an experienced tattooist. TattoosAI can help you visualize motifs, styles, palettes, and broad arrangements, but the artist should resolve anatomy, stencil details, line weight, healing considerations, technical feasibility, and cultural questions. Your tattooist may rotate a face, enlarge a focal subject, remove a crowded detail, or redesign the endpoint after seeing your actual arm.
A half sleeve is also a staged commitment. Verified guide data places typical half-sleeve ink work at 8 to 15 hours, while broader coverage describes many projects as taking 3 to 6 sessions over a few months, depending on style and complexity. Those figures are planning references, not promises. Your artist's estimate should account for the chosen technique, existing tattoos, skin, placement, and how much detail you want to preserve.
Choose the concept that still works when simplified. A design with fewer but stronger elements often gives the artist more room to create clean flow and durable contrast. A complex idea can succeed, but only when its hierarchy is clear and its details support the arm rather than competing with it.
Start your next studio conversation with a brief that names the focal subject, supporting motifs, endpoints, flow, negative space, palette, and style. Bring several TattoosAI variations, explain what you like in each, and let the artist turn that direction into a tattoo that fits your anatomy and can be executed responsibly.
TattoosAI lets you describe a half-sleeve concept, explore styles such as Japanese, geometric, watercolor, dotwork, realism, 3D, and blackwork, and compare multiple generated directions before your consultation. Create your variations with TattoosAI, then bring the strongest concepts to your tattooist for professional refinement.